The Art of Turning Yesterday’s Teabags into Warm Tea-Infused Cookies and Scones
I drink a lot of tea. Somewhere along the way between therapy and my night terrors I turned to chamomile and lavender as my comforting friend.
The thing that gets to me some days though is that you lift the teabag from your mug, watch the last drop fall, and for years I’ve simply tossed it out. Sometimes I went through a compost phase, but most of the time it was just trash, then gone.
The other day though I caught myself staring at that little pouch and thought…what if this tiny leftover still had more to give? What if the same leaves that brought me comfort at the start of my day could quietly return at the end of it, transformed into something warm, buttery, and edible? If you know me, you know I’m all about the edible as well as the warm and gooey.
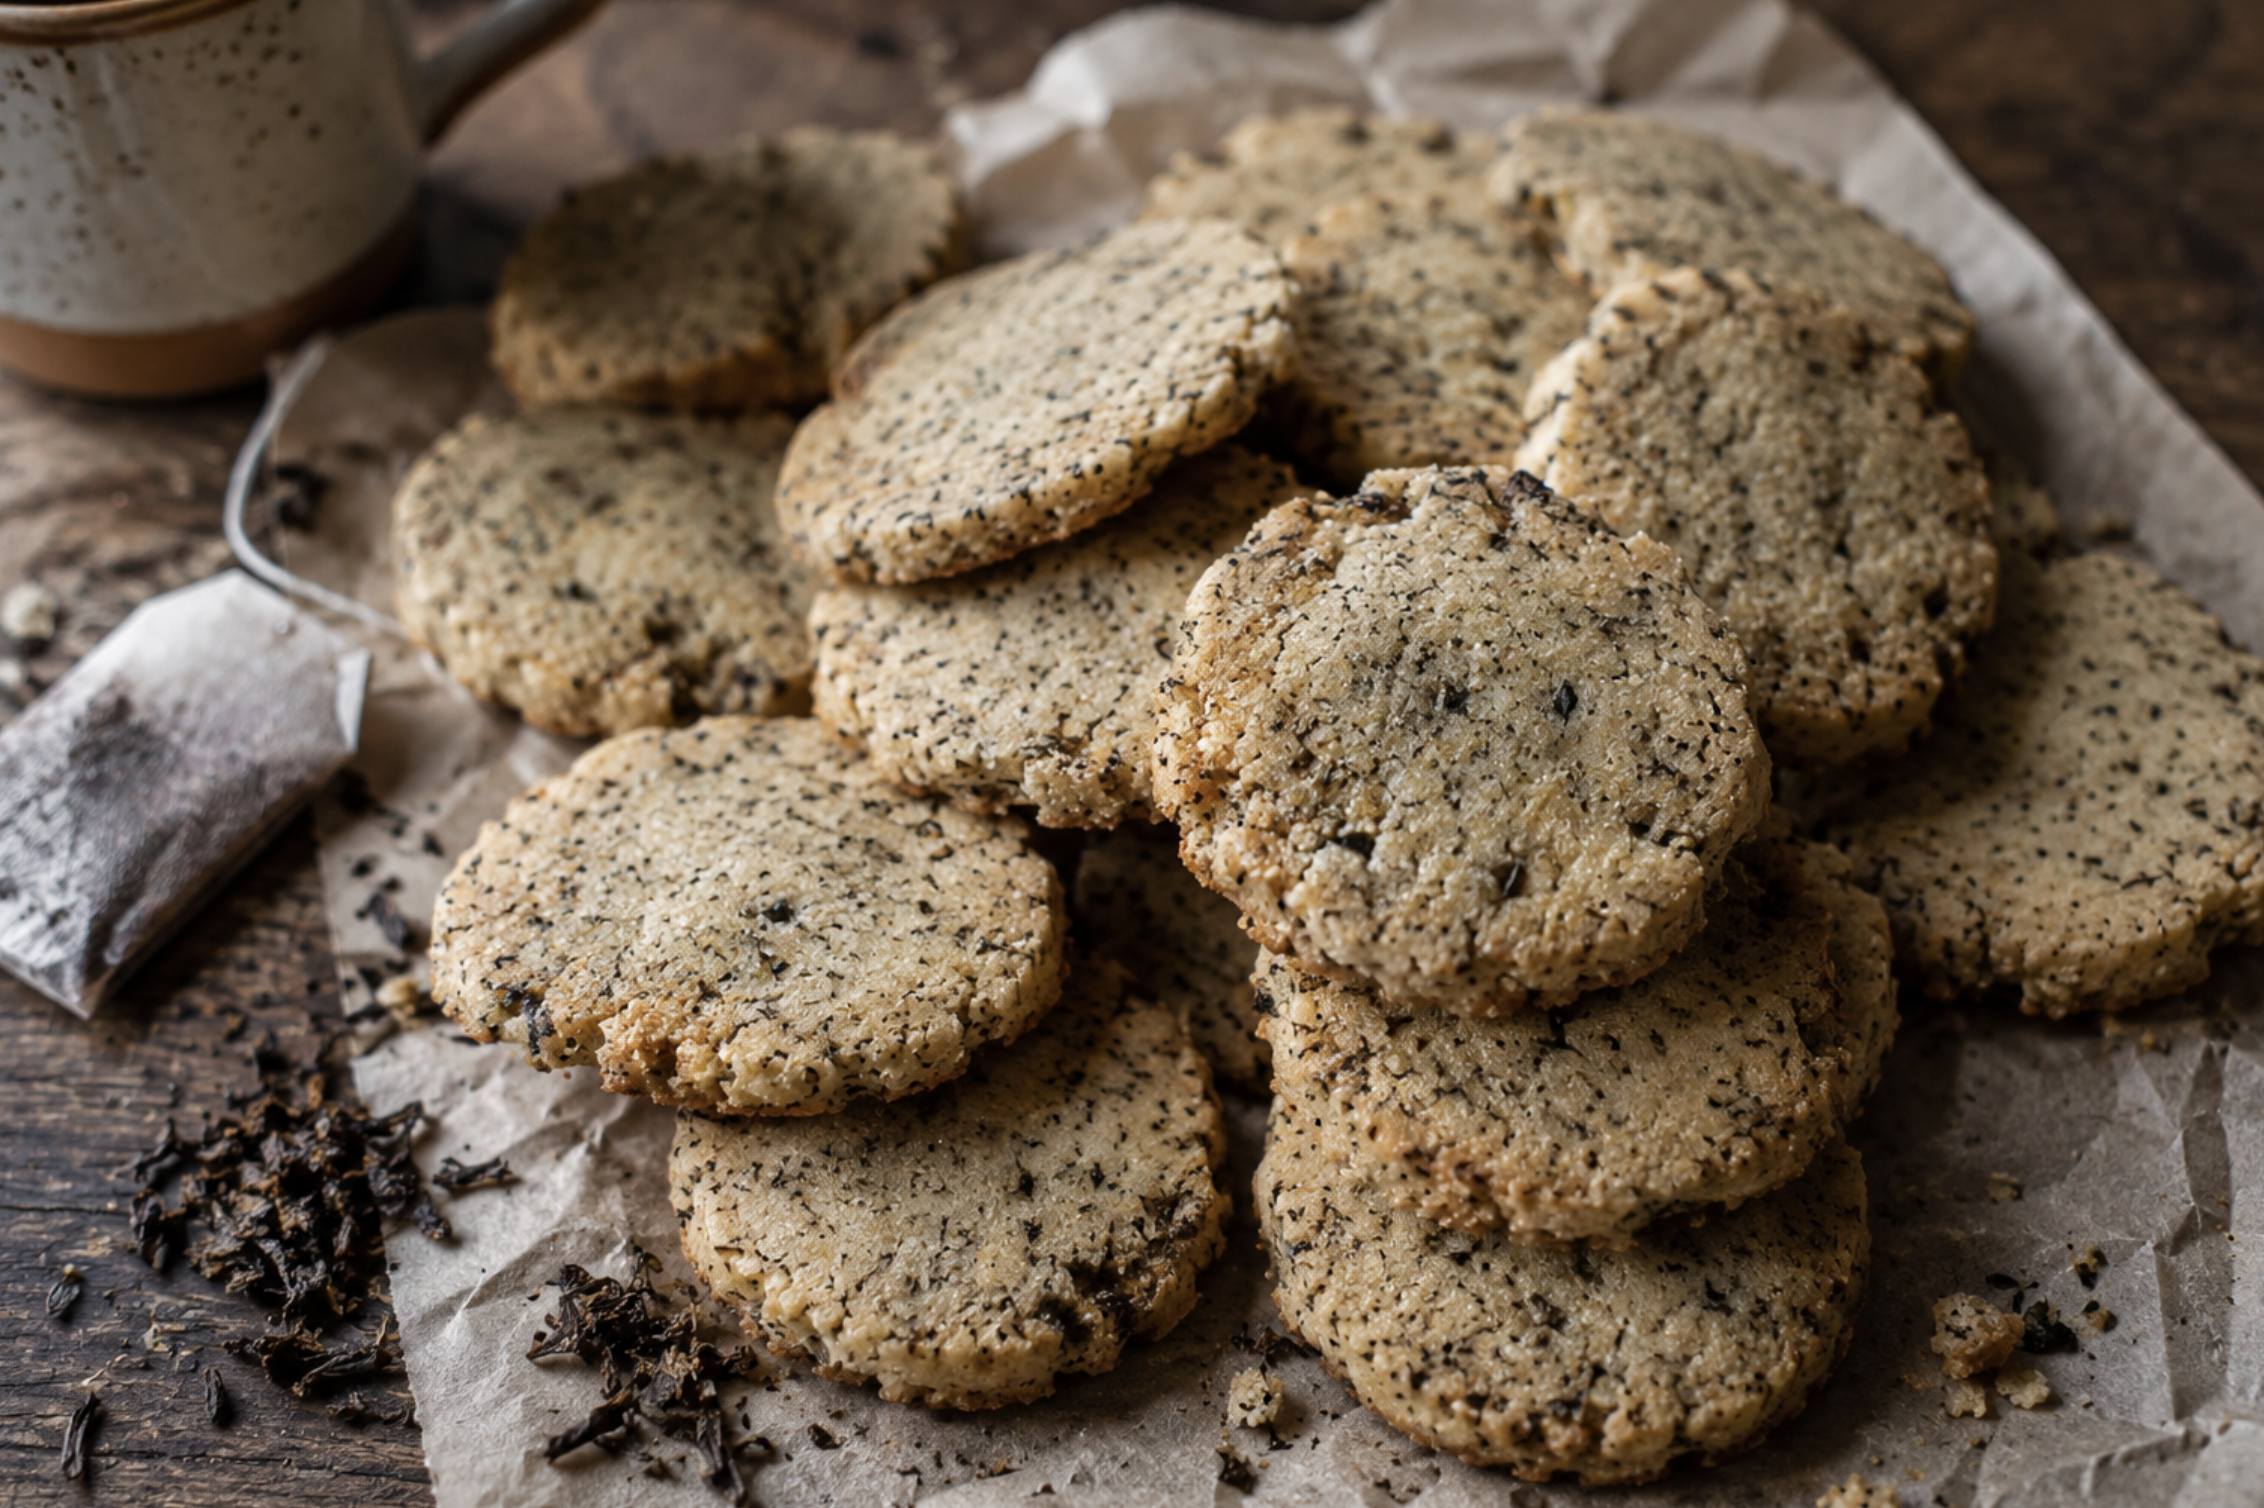
That small wondering became Second Steep Shortbread. It’s not a complicated baking project, and it wont test your skills at all, it’s just a cute little idea that turns yesterday’s teabags into today’s gentle reward.
If you’ve followed Dopamine Hobbies for a while, you already know this is the kind of project I keep coming back to, the ones that feel like massage for your nervous system. On days when everything feels a little too loud or too sharp, I reach for my little projects to keep me grounded. The kitchen fills with the exact same soothing tea scent that started my morning as my fingers sink into warm, fragrant dough.
I’ve found that when the timer dings, there are cookies that taste faintly of the tea I already adore. It’s zero-waste magic wrapped in the coziest possible package. This is more about the tiny, tangible wins that remind you you’re capable of turning ordinary things into something a little more beautiful than it is making a cool Instagramable project, but right now, with so many of us craving gentler ways to spend our time, this recipe feels especially needed.
Why Second Steep Shortbread Is Pure Dopamine Hobby Gold
There’s something deeply satisfying about closing the loop on my daily tea habit that I love. You already have the teabags, they’re not an extra purchase or a special trip to the store at all. Saving them, drying them, and steeping them into butter creates that quiet “I made something from nothing” rush that lands straight in your nervous system.
The whole process itself is designed for calm and steady. The slow infusion step is pure sensory meditation, watching the butter gently change color while the tea aroma rises is as addictive as Candy Crush. Mixing by hand gives your body the exact kind of grounding movement that so many of us crave when our minds feel scattered.
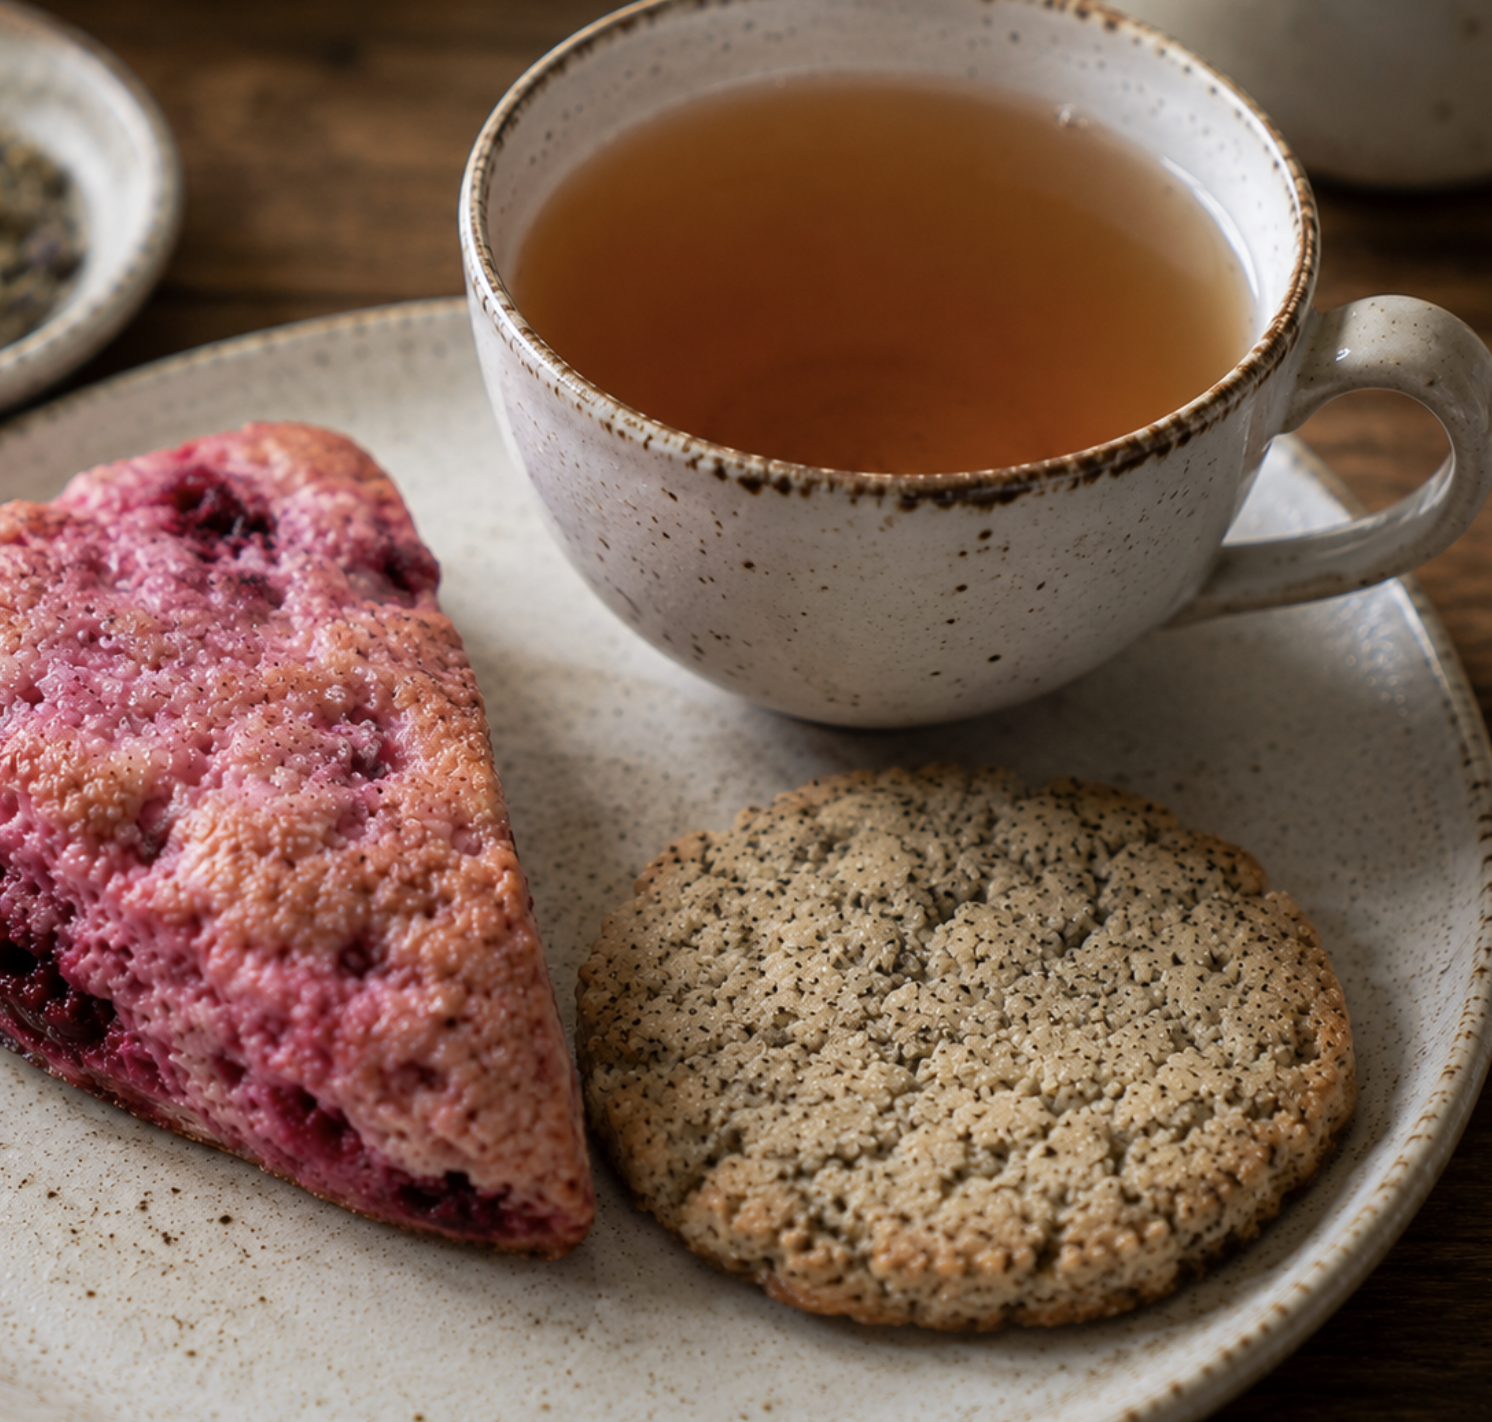
The finished cookies deliver an immediate reward: warm, buttery, faintly tea-scented bites that feel like a hug you made for yourself.
It’s also a beautiful entry point into mindful baking. You don’t need to go out and buy any fancy equipment and there’s absolutely zero pressure for perfect shapes (I went with circles because I felt like trying to make them look pretty for this blog post). Even if your cookies come out a little uneven or the flecks of tea are scattered in funny patterns, they still taste like comfort.
That imperfection is the point, and to me, it’s proof that dopamine hobbies are about the feeling, not the Instagram grid. Plus, it’s genuinely zero-waste. Every used teabag you save keeps one more thing out of the trash. Small acts like this add up, and they feel good in a way that’s hard to explain until you’ve tried it.
A lot of baking projects can feel overwhelming, but this one is the opposite. The entire process is built to be low-pressure and high-reward for your nervous system. There’s also something about working soft, fragrant butter and flour with your fingers that feels like playdough for grown-ups. Also, no mixer means no loud noise, no extra dishes, just you and the bowl. It’s the kind of tactile feedback that helps reset an overstimulated brain.
Tea-infused butter smells different from regular butter too, it’s warmer, more comforting, and almost nostalgic. That aroma lingers in your kitchen long after the cookies are done, turning the whole space into a gentle reminder that you created something good.
What You’ll Need (With Easy Substitutions)
This recipe stays deliberately simple so you can make it even on low-energy days:
Core ingredients:
8–10 used teabags (black tea, Earl Grey, chai, herbal, whatever you normally drink works beautifully) I choose a combination over probably a week of saving my teas of lavender, chamomile and Earl Grey and I couldn’t recommend it enough.
1 cup (2 sticks / 226g) unsalted butter
½ cup (60g) powdered sugar (or ⅓ cup granulated sugar if that’s what you have)
2 cups (250g) Italian flour (trust me on this and read this article if you don’t know why)
Pinch of salt (about ¼ teaspoon)
Optional but lovely add-ins:
½ teaspoon vanilla bean paste
Zest of one lemon or orange
A tiny pinch of cinnamon or cardamom if you want extra warmth
Tools (nothing fancy):
Small saucepan
Fine mesh strainer or cheesecloth
Mixing bowl
Spoon or your hands
Parchment paper
Baking sheet
Sharp knife (for slicing) or cookie cutter if you want shapes
Substitutions are welcome: dairy-free butter works perfectly, and gluten-free flour blends can be swapped 1:1 (just note the texture might be a touch more delicate).
1. Save and dry the tea leaves
After your daily cups of tea, empty the used teabags onto a plate or small tray. Spread the leaves out a little so they dry evenly. Leave them on the counter for a few hours or overnight. You’ll notice they start to smell gently toasted and cozy as they dry.
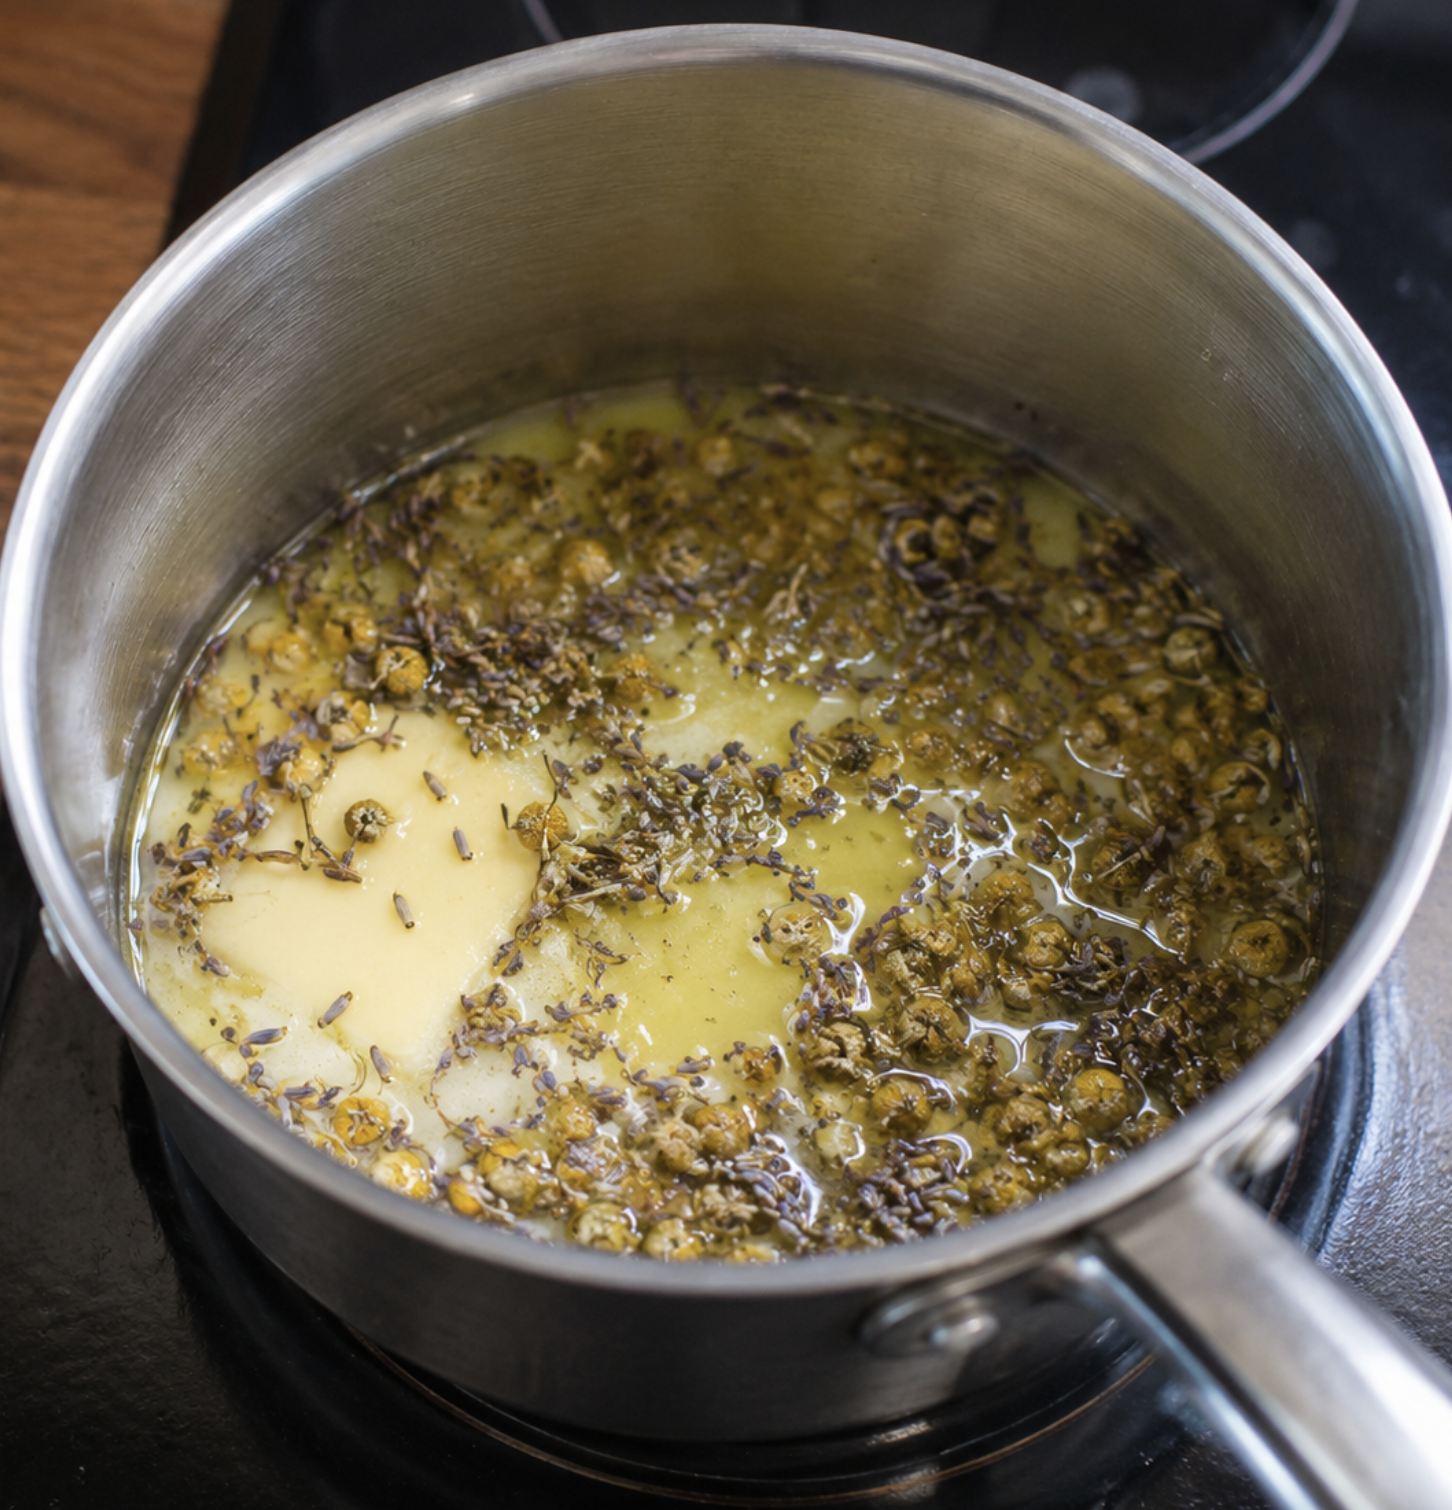
2. The mindful butter infusion (the heart of the project)
Place the butter in a small saucepan over the lowest heat. Add 3–4 tablespoons of your dried tea leaves (the more you saved, the stronger the tea flavor will be and same deal with the more you add). Let it steep gently for 8–12 minutes, stirring once or twice. You’ll see the butter slowly turn a beautiful soft golden-amber. The kitchen should fill with the most comforting tea aroma.
Take it off the heat and strain through a fine mesh strainer or cheesecloth, pressing gently on the leaves to get every drop of flavor. Let the infused butter cool until it’s soft and spreadable but not liquid. It took me about 20–30 minutes at room temperature.
3. Mix the dough by hand
In a bowl, combine the infused butter and sugar. Stir until creamy and smooth. This is where your hands get to do the soothing work with no electric mixer needed. Add the flour and salt (plus any vanilla or zest). Mix with your fingers until the dough comes together into a soft, slightly crumbly ball. I wanted these cookies to taste even more like tea, so I added some more of the dried lavender in at the end of mine. You’ll see tiny flecks of tea leaf throughout, and that’s the rustic beauty of it.
4. Shape and chill
Form the dough into a log about 2 inches thick. Wrap it in parchment or plastic wrap and pop it in the fridge for 20–30 minutes. (You can skip this if you’re impatient, the cookies will just spread a tiny bit more.)
While it chills, preheat your oven to 350°F / 175°C.
5. Bake
Slice the log into ¼-inch thick coins or gently roll the dough and cut simple shapes. Place them on a parchment-lined baking sheet.
Bake for 10–14 minutes until the edges are just barely golden. They’ll smell incredible. Let them cool on the tray for a few minutes before moving. The first warm one is basically mandatory to eat as fast as possible.
Troubleshooting & Tips
Butter too firm after cooling? Let it sit on the counter for 10 more minutes.
If the dough is too crumbly then add 1 teaspoon of milk or water and work it in gently.
If you want stronger tea flavor then you can save more teabags next time, add some to the dough itself, or steep a little longer.
If your cookies are spreading too much then make sure your butter wasn’t too warm when you mixed the dough.
Second Steep Raspberry Scones
Makes 8 large bakery-style scones
What You’ll Need:
2 cups (250g) Italian flour (trust me on this and read this article if you don’t know why)
1/2 cup (100g) granulated sugar
1/2 teaspoon salt
2 1/2 teaspoons baking powder
1/2 cup (113g) unsalted butter, frozen
1/2 cup (120ml) heavy cream or buttermilk
1 large egg
1 1/2 teaspoons vanilla extract
3–4 tablespoons dried tea leaves from previously used tea bags
1 cup fresh raspberries
1 tablespoon honey
Optional: zest of 1 lemon
For topping:
2 tablespoons cream
Coarse sugar
1. Save and dry the tea leaves
After your daily cups of tea, empty the used teabags onto a plate or small tray. Spread the leaves out a little so they dry evenly. Leave them on the counter for a few hours or overnight. You’ll notice they start to smell gently toasted and cozy as they dry.
2. The mindful butter infusion (the heart of the project)
Place the butter in a small saucepan over the lowest heat. Add 3–4 tablespoons of your dried tea leaves (the more you saved, the stronger the tea flavor will be and same deal with the more you add). Let it steep gently for 8–12 minutes, stirring once or twice. You’ll see the butter slowly turn a beautiful soft golden-amber. The kitchen should fill with the most comforting tea aroma.
Take it off the heat and strain through a fine mesh strainer or cheesecloth, pressing gently on the leaves to get every drop of flavor. Let the infused butter cool until it’s soft and spreadable but not liquid. It took me about 20–30 minutes at room temperature.
3. Freeze & Grate the Butter
Place butter in freezer for at least 30 minutes.
4. Mix Dry Ingredients
Combine your flour, sugar, salt, baking powder, lemon zest (if using) and stir together. Using a box grater grate the frozen butter directly into the flour mixture. Toss gently until coated. The mixture should resemble coarse crumbs.
5. Mix Wet Ingredients
Whisk together heavy cream, eggs, vanilla and pour into dry ingredients. Fold gently.
6. Cook Down Raspberries
I think my raspberries are a little too juicy to add to the dough as is, so I cook about a cup down with a tablespoon of honey until sticky. Cool then add raspberries last. Expect some to break apart, that's part of the rustic charm.
7. Shape
Turn dough onto a lightly floured surface and press into an 8-inch circle. Don't overwork it and cut into 8 wedges like a pizza. Transfer to baking sheet and pop in the freezer for 15 minutes.
8. Bake
Brush tops with cream and sprinkle with coarse sugar. Bake at 400°F (204°C) for 20–25 minutes until deeply golden.
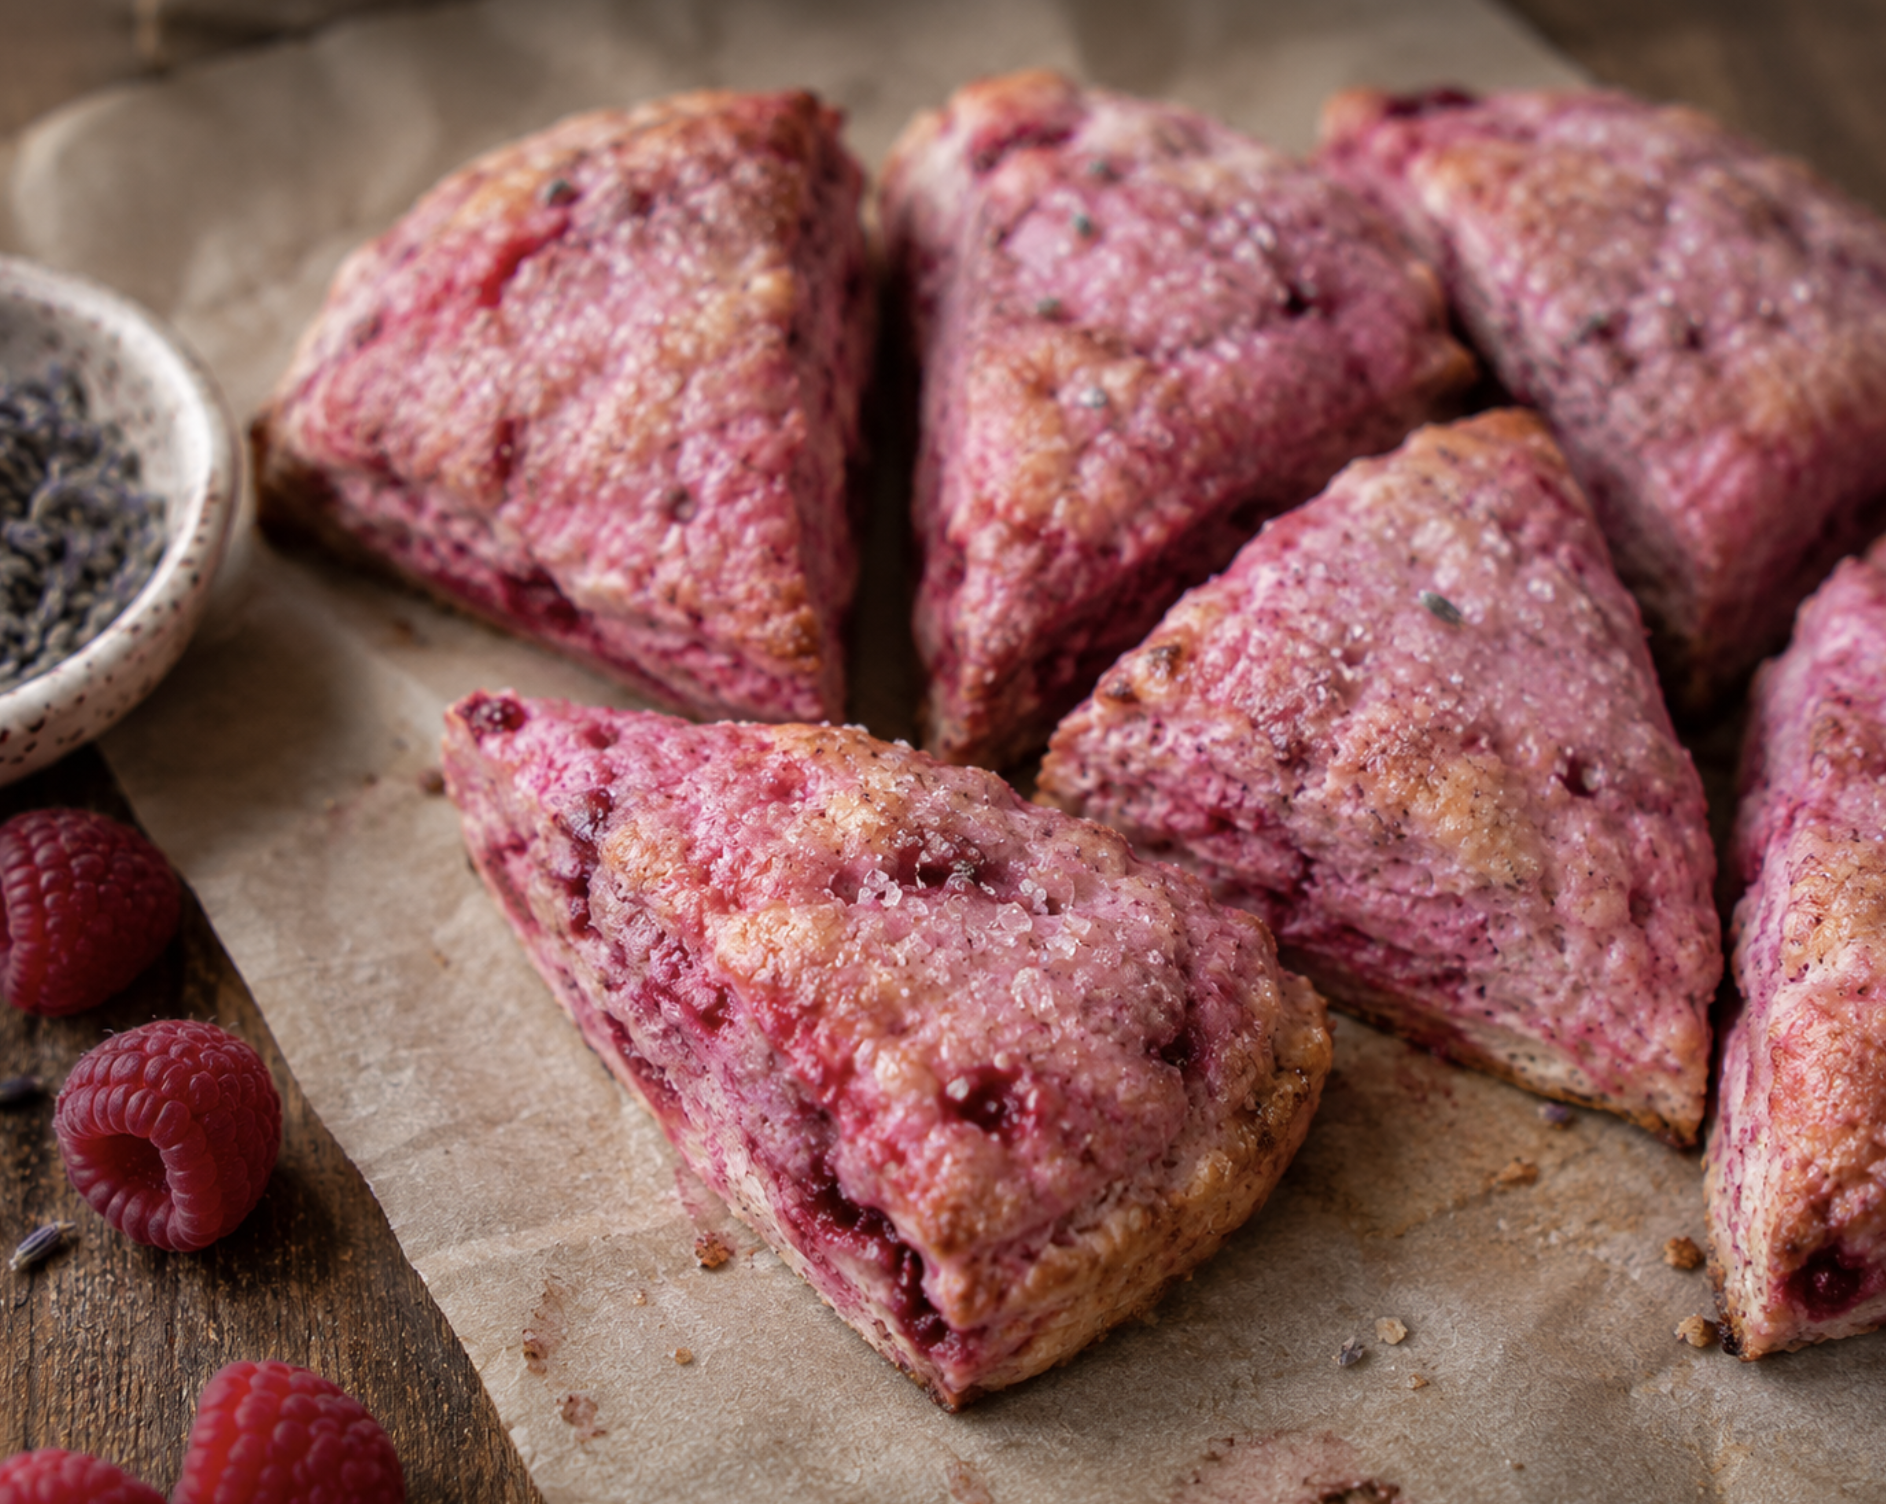
raspberry lavender scones
Both the cookies and the scones freeze wonderfully. Bake a double batch, freeze the dough log, and slice straight from the freezer whenever you need a dopamine hit.
Frequently Asked Questions
Can I use fresh tea instead of used?
Yes, but the used-and-dried version has a softer, more toasted flavor that feels special for this project.
Will the cookies be very “tea-flavored”?
No, it’s subtle and delicate, more like a beautiful background note than a strong tea taste.
Can I make this without an oven?
Yes! Turn the dough into no-bake energy bites: roll into small balls and coat in cocoa or more tea leaves.
Your daily tea already brings you comfort…now it can bring you cookies too.
Related Reads you Might Enjoy:
The Psychology of Tiny Things: Why We Love Miniatures, Dolls, and Dioramas
Make Plantable Seed Paper From Junk Mail: A Crafty Way to Grow Beauty from Trash
Soap Carving: The Gentle Art of Shaping Something Small and Sacred
The Cleanest Soap You’ve Never Heard Of: Soapnuts and the Science of Suds
Watercolor Painting: The Soft Art of Coming Back to Yourself
Feeling Worthless? Here’s Why the Odds of You Existing Are the Most Beautiful Miracle